UV DTF transfer delivers vibrant color, a soft hand-feel, and durable performance for custom apparel, making it a top choice for creators seeking mix-and-match versatility. If you’re new, here’s a quick guide on how to use DTF transfer to achieve clean edges and sharp details on a range of fabrics. This method is firmly rooted in UV printing on fabric, and the ink cures instantly for fast production without sacrificing color fidelity. As a flexible option for custom apparel transfer, UV DTF delivers bold imagery on light and dark garments with a soft touch. When weighing UV DTF vs traditional DTF, consider production speed, durability, and fabric compatibility to choose the best fit for your project.
From an alternative-terms perspective, think of UV-based garment printing, UV-curable ink applications, and digital transfer on textiles as a unified approach to decorating fabric. These methods share goals with other custom apparel transfer techniques—bright color, sharp detail, and a soft hand—while delivering faster cure times and easier workflow. LSI-friendly descriptions like UV printing on fabric, direct-to-film with UV inks, and heat-applied artwork help designers compare outcomes across different processes. Considering UV DTF vs traditional DTF and related methods, you can weigh factors such as fabric compatibility, batch size, and durability to pick the best option for your project.
1) Understanding UV DTF Transfer: What It Is and Why It Excels for Custom Apparel
UV DTF transfer is a modern method that uses UV-curable inks printed onto a transfer film, which is then applied to fabric with heat. This process yields vibrant color, a soft hand-feel, and durable results across a wide range of fabrics, making it a strong option for custom apparel transfer projects. By leveraging UV curing, you can achieve crisp lines, smooth gradients, and high color fidelity that stand up to repeated wear and washing.
If you’ve previously used traditional heat-transfer methods, you’ll notice how UV DTF transfer delivers sharper details and better color retention on complex designs. This approach sits within the broader family of UV printing on fabric, offering a practical path for small batches and designs that need precise rendering of fine text or photo-realistic imagery. For anyone evaluating print methods, it’s worth exploring how to use DTF transfer effectively to maximize results.
2) UV DTF Transfer vs Traditional DTF: A Practical Comparison for Designers
A common question is how UV DTF transfer compares to traditional DTF. UV DTF inks cure instantly, enabling faster production cycles and reducing ink bleed, while maintaining a broad color gamut that enhances photos and sharp edges, particularly on light backgrounds. The result can feel more like a high-quality print with a softer hand than typical vinyl or thermal transfers.
Traditional DTF remains a viable option for certain fabrics and workflows, especially when equipment or ink sets are already in place. The best choice often depends on fabric mix, order size, and color requirements. By weighing durability, ease of use, and overall print quality, you can determine whether UV DTF or traditional DTF best suits a specific custom apparel transfer project.
3) Essential Tools and Materials for a Smooth UV DTF Workflow
Setting up a UV DTF workflow starts with a printer capable of UV-curable inks or a compatible UV curing system, along with UV-curable inks designed for textiles and a release film or PET sheet. A coating powder, curing device, and a heat press with temperature control are also key, plus protective sheets and tape to keep the transfer aligned during application.
Other practical items include a cutter for trimming, a prepress board or silicone pad for crisp transfers, and a test fabric swatch library to verify compatibility before a production run. When choosing tools, consider how to optimize the process for your specific fabric types and how to use DTF transfer steps consistently to achieve repeatable, high-quality results.
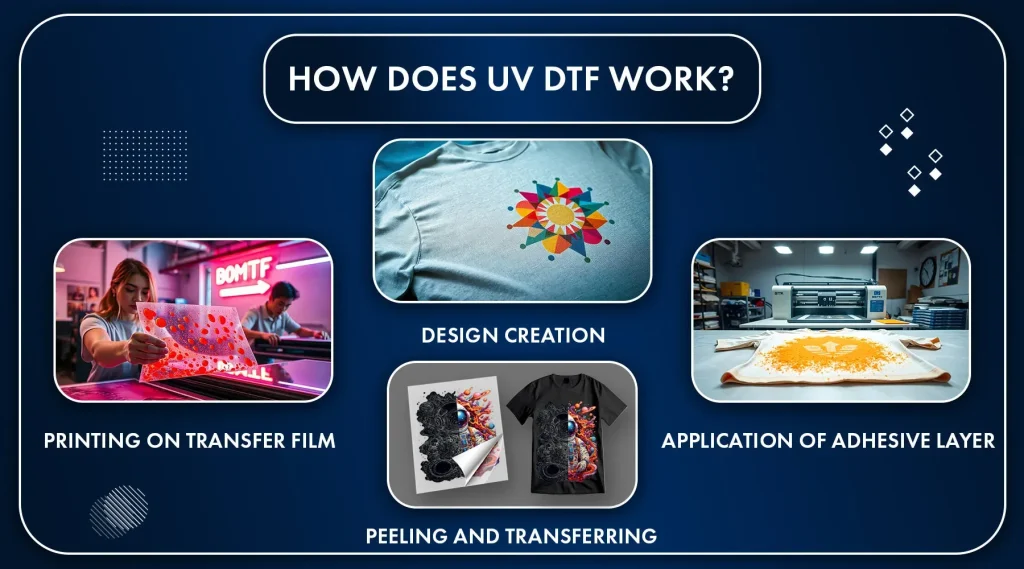
4) Step-by-Step: How to Use DTF Transfer with UV Inks
Preparing artwork involves using vector elements for sharp edges and gradients, plus a suitable color profile for UV inks. On dark fabrics, a white under-base can help maintain brightness, and exporting in PNG or TIFF with transparency supports non-rectangular designs. Ensure your design includes any branded elements and a legible composition.
Printing on transfer film should follow your ink’s recommended resolution (often 300 dpi for fine text). After printing, apply the adhesive powder evenly, cure the sheet according to the ink and powder guidelines, trim, and position it on the garment with secure borders if needed. Heat and pressure are then applied to transfer the design, followed by a peel and a cooling period as you finish the assembly.
5) Maximizing Color, Detail, and Durability on Light and Dark Fabrics
To preserve color vibrancy and detail, consider using UV printing on fabric with proper base layers. On dark fabrics, a white underbase helps maintain brightness, while on light fabrics you can rely on the vivid hues that UV inks provide. The transfer’s soft hand and color saturation make it well-suited for complex designs and photo-real imagery within the custom apparel transfer workflow.
Practice color management and proofing to account for how UV inks may appear on the transfer film versus on actual fabric. Testing on similar swatches saves time and ensures consistent results. Always use high-quality transfer films designed for DTF workflows and follow the supplier’s guidelines to avoid cracking or poor adhesion during washing.
6) Care, Troubleshooting, and Real-World Applications of UV DTF Transfers
Care and maintenance are essential for durability. If cracking or peeling occurs after washing, recheck temperature, dwell time, and the powder curing step, since inadequate curing is a common cause. Color bleed can indicate over-wetting during prepress or insufficient curing of UV inks, so run controlled tests to find the right balance.
Real-world applications showcase the versatility of UV DTF transfers for teams, events, schools, and boutique brands. These transfers excel for limited runs and photo-heavy artwork, delivering high-quality pieces quickly without the need for more complex textile printing equipment. With careful testing and consistent workflow, UV DTF transfer can be a powerful asset in your custom apparel strategy.
Frequently Asked Questions
What is UV DTF transfer and how does it compare to traditional DTF?
UV DTF transfer uses UV-curable inks printed on a transfer film and cures instantly with a UV lamp before heat pressing onto fabric. This yields vibrant color, a soft hand feel, and durable results, with crisper details than many traditional heat-transfer methods. Compared to traditional DTF, UV DTF often offers faster production, a broader color gamut on film, and a streamlined workflow for custom apparel transfer, though outcomes depend on fabric and ink compatibility.
How to use DTF transfer in a UV DTF transfer workflow?
To use DTF transfer in a UV DTF transfer workflow, design with UV inks in mind, print on the transfer film using UV-curable inks at high resolution, then apply the adhesive powder and cure. Trim the sheet, prepare the garment, position the transfer accurately, and heat press at the recommended temperature and dwell time (for many UV DTF transfers around 150–170°C for 10–15 seconds). Peel according to the supplier’s guidance and perform a post-cure check for durability.
Which fabrics are best for UV printing on fabric when using UV DTF transfer for custom apparel transfer?
Fabrics like cotton, cotton blends, and many poly blends work well with UV printing on fabric using UV DTF transfer. Some synthetics or textured fabrics may require compatibility testing and process adjustments. For dark fabrics, consider a white base under the color layer to maintain brightness after transfer.
UV DTF vs traditional DTF: which should I choose for custom apparel transfer?
UV DTF offers vibrant color, sharp edges, and a softer hand with durable adhesion, especially on light and white fabrics, while traditional DTF may be preferable for certain fabrics, larger batch sizes, or setups optimized for conventional DTF workflows. The best choice depends on your workflow, fabric mix, order size, and color requirements—testing swatches can help you decide.
What tools and steps are required to perform UV DTF transfer?
Essential tools include UV-curable inks or a UV curing system, a DTF transfer film, a release film, a curing device, a heat press, silicone or teflon sheets, adhesive powder, heat-resistant tape, a cutter, and a prepress board. Key steps are designing, printing on the transfer film, coating with powder, curing, trimming, aligning on the garment, applying heat and pressure, performing the peel, and (if needed) a post-cure check.
What are common issues with UV DTF transfer and how can I troubleshoot them?
Common issues include cracking or peeling after washing, color bleed, and misregistration. They’re often caused by inadequate curing, incorrect temperature or dwell time, moisture in the fabric, or poor alignment. Troubleshoot by ensuring proper curing, adjusting heat and time, removing moisture during prepress, securing the transfer with tape, using appropriate protective sheets, and following the recommended peel method and post-cure instructions.
| Aspect | Key Points |
|---|---|
| What is UV DTF transfer |
|
| Benefits |
|
| What you need |
|
| Step-by-step overview |
|
| Care, maintenance, and troubleshooting |
|
| UV DTF vs Traditional DTF |
|
| Real-world applications |
|
| Tips and best practices |
|
Summary
UV DTF transfer is a powerful option for creating premium custom apparel with vibrant color and clean detail. By understanding the process, gathering the right tools, and following a careful step-by-step workflow, you can achieve professional results that stand up to wear and washing. This approach emphasizes sharp color fidelity, soft hand-feel, and broad fabric compatibility, making it well-suited for small batches and designs with complex details. When choosing between UV DTF transfer and traditional methods, consider your workflow, fabric mix, order size, and color requirements to determine the best fit for your project.