DTF workflow has emerged as a popular option for apparel decorators seeking high-quality, detailed designs across a wide range of fabrics. From concept to finished shirt, the DTF printing process combines film-based transfer with precise heat pressing for durable results. Understanding the DTF transfer workflow helps teams plan color management, optimize curing time, and reduce setup for small-batch orders. This guide covers design tips, film handling, and quality checks to ensure consistent results and faster turnaround. Compared with traditional methods like DTF vs screen printing, the film-to-garment approach offers flexibility and vibrant output on diverse textiles.
Viewed through the Direct-to-Film process lens, this approach describes a film-based transfer path rather than a direct-to-fabric print. Artwork is printed onto a PET film, coated with adhesive powder, and then cured before being pressed onto textiles to secure a durable finish. Alternative terms you’ll encounter—such as the film-to-fabric transfer method, the print-on-film workflow, and garment-focused heat-transfer systems—signal the same core technique while improving search relevance. Framing the topic with these related concepts supports better color management, consistent curing times, and fabric compatibility across runs.
DTF workflow essentials: how it differs from screen printing and DTG
The DTF workflow represents a film-based approach to t-shirt decoration where designs are printed on a PET film with a white underbase and CMYK inks, then transferred to fabric using an adhesive powder and heat. This process emphasizes a clear separation between design creation, film handling, and heat-transfer steps, which provides flexibility in garment choices, color management, and run size. By focusing on a film-to-fabric transfer, operators can achieve detailed, high-opacity results across a broad range of fabrics. This key distinction from traditional methods frames how you plan, prepare, and quality-check each stage of the project.
When compared to screen printing and DTG, the DTF workflow often offers faster setup for small runs, simpler color handling, and easier scalability for mixed-color designs without screens. The transfer-based approach can reduce per-unit costs on lower-volume orders and enables consistent results on dark fabrics when the white underbase and adhesive powder are applied correctly. Evaluating the end-to-end DTF printing process against alternative methods helps shops optimize budgets, lead times, and material compatibility.
DTF design tips to maximize color, opacity, and durability
In the design phase, apply practical DTF design tips to ensure vibrant, durable results. Start with high-resolution artwork (300 dpi or higher) and prioritize vector elements for logos and typography to maintain sharp edges after scaling. Preparing artwork with CMYK color management in mind helps preserve vibrancy on dark garments, while deliberate white underbase placement improves opacity and color fidelity during the transfer.
Plan color separations with the printer’s profile and consider spot colors where necessary to maintain consistent hues across runs. Build in safe margins for the transfer and account for edge behavior on the film. These considerations feed directly into the DTF printing process and downstream steps, including powder adhesion, curing, and the final wash durability of the finished shirt.
From design to film: step-by-step overview of the DTF printing process
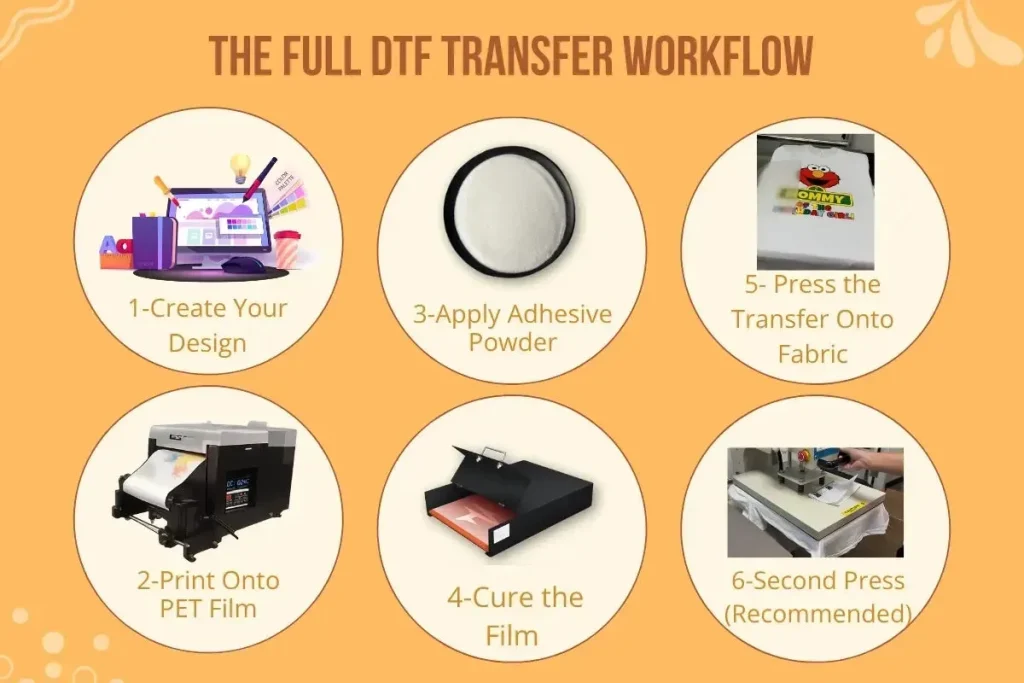
Begin with artwork preparation and sizing, ensuring compatibility with the target garment and the printer’s color workflow. Once finalized, print the design onto PET film using a DTF printer with CMYK inks, and include a white underbase if the design requires enhanced opacity on dark fabrics. The film produced in this stage captures the detail and color richness of the original artwork and serves as the foundation for the subsequent adhesive coating.
Next, apply a light layer of adhesive powder to the printed film and cure it to create a functional bond surface. Prepare the garment with a pre-press to remove moisture and wrinkles, then align the film on the shirt and use a heat press to transfer the design with the manufacturer-recommended dwell time. The final steps — peeling and optional post-curing — seal the transfer and contribute to wash durability, completing the DTF printing process from concept to finished garment.
DTF curing time optimization for consistent results
Curing time is a critical parameter in the DTF workflow because it governs the adhesive’s proper activation and bond strength. Too little curing can lead to powder shedding and weaker adhesion, while over-curing can distort the film or over-activate the adhesive. Start with the manufacturer’s guidelines and adjust iteratively based on test results to find a repeatable curing time for your specific powder, film, and printer setup.
Tracking curing time across different material combinations creates a reliable, repeatable formula for future runs. Document the exact temperature, dwell duration, and the materials used so you can reproduce outcomes and minimize waste. Regular calibration and small, controlled test prints help ensure consistent color density and transfer durability across lots of garments.
DTF transfer workflow best practices across fabrics
Optimizing the DTF transfer workflow involves tailoring heat press parameters, film handling, and garment preparation to the fabrics you use. The transfer process benefits from a stable, pre-warmed surface, even pressure, and precise dwell times to ensure consistent bonding of the adhesive powder to both the film and fabric. By treating each fabric type—cotton, blends, or synthetics—as a separate variable, you can achieve predictable outcomes and reduce misprints.
As you expand into new fabrics, perform wash tests and collect data on adhesion, color fastness, and fabric compatibility. Calibrate color profiles regularly to avoid drift across runs, and maintain organized SOPs for each step in the DTF transfer workflow. Good workflow discipline reduces waste and helps you scale production without sacrificing quality.
DTF vs screen printing: choosing the right method for your shop
When deciding between DTF and screen printing, evaluate factors such as startup costs, setup time, batch size, and the complexity of designs. DTF vs screen printing often shines for small runs and multi-color designs, offering quicker setup and easier color management without the need for creating and reclaiming screens. This makes the DTF printing process attractive for shops that handle frequent color changes or variable data.
Consider other comparison points like energy usage, garment variety, and post-processing needs. For some orders, DTG or HTV may still be the better fit, but DTF provides robust performance on dark fabrics and across a broader range of materials. By weighing these factors alongside the DTF transfer workflow, teams can choose the method that best aligns with budget, throughput, and quality goals.
Frequently Asked Questions
What is the DTF workflow, and how does it differ from the DTF printing process and other methods?
The DTF workflow is a film-based process: artwork is printed onto a PET film with a white underbase and CMYK inks, then coated with adhesive powder, cured, and heat-transferred to fabric. It differs from direct-to-garment (DTG) printing and traditional screen printing because you transfer from film rather than printing directly on fabric, which improves color management and enables reliable results on a wide range of fabrics, including dark garments. This end-to-end flow—from design to finished shirt—combines design preparation, film handling, curing, and pressing to deliver consistent results.
What are essential DTF design tips to optimize the DTF workflow for dark garments?
Key DTF design tips include: prepare artwork at high resolution (300 dpi or higher) for clean scaling; use vector elements for sharp logos and text and reserve high-resolution raster areas for photos; plan color separations with the printer’s CMYK profile and apply spot colors to preserve vibrancy on dark fabrics; include a white underbase when needed to improve opacity; and leave a safe margin around edges to accommodate the transfer and trimming.
What is the recommended DTF curing time, and how does curing time affect the transfer in the DTF transfer workflow?
The curing time depends on your film, powder, and printer setup. Start with the manufacturer’s guidelines and run small test batches, adjusting time in small increments based on results. Proper curing reduces powder shedding and ensures a strong bond during the DTF transfer workflow; over-curing can distort the film or over-activate adhesive, reducing transfer quality.
How does the DTF workflow compare to screen printing when producing multi-color designs (DTF vs screen printing)?
DTF workflow offers faster setup for small or single-color runs and easier color management without screens, while screen printing remains cost-effective for large runs with few colors. DTF handles complex, multi-color designs on a broad range of fabrics, including dark garments, with less manual setup. Consider your order size, color complexity, and garment variety when choosing between DTF vs screen printing.
What steps are involved in the DTF workflow from design to finished shirt in the DTF printing process, and what quality checks should you perform?
From design to finished shirt, the DTF printing process typically involves: (1) preparing artwork with proper sizing and color separations, (2) printing onto PET film with CMYK inks (plus white underbase if needed), (3) applying and curing adhesive powder, (4) pre-pressing the garment, (5) transferring the design with heat and the recommended dwell time, (6) peeling at the correct moment and performing post-curing if required. Key quality checks include color verification against proofs, inspecting powder adhesion, ensuring even heat and pressure during transfer, and conducting a wash test on a sample to confirm durability.
What are common quality control checks and how do you troubleshoot issues in the DTF transfer workflow?
Common QA checks in the DTF transfer workflow include verifying color accuracy against proofs, inspecting powder adhesion after curing, ensuring even heat and pressure during the transfer, and performing a wash test for durability. If issues arise, troubleshoot by adjusting RIP color profiles and calibration, re-running test prints, fine-tuning curing time and heat settings, verifying film handling and alignment, and iterating with small production runs before full-scale orders.
| Topic | Key Points |
|---|---|
| What is the DTF workflow and how it differs |
|
| Design phase: tips for a smooth DTF workflow |
|
| Step-by-step: from design to finished shirt |
|
| Materials, equipment, and setup for a reliable DTF workflow |
|
| Safety and workflow tips |
|
| Quality control and troubleshooting in the DTF workflow |
|
| DTF curing time and optimization |
|
| DTF vs other methods: choosing the best approach for your business |
|
| Cost, scalability, and best practices for long-term success |
|
Summary
DTF workflow is an end-to-end process for producing apparel using a PET-film transfer method that delivers high-fidelity designs on a range of fabrics. From design through printing, powder coating, curing, and transfer, the DTF workflow emphasizes careful preparation, reliable equipment setup, consistent curing, and thorough quality checks to deliver durable, vibrant shirts. This approach supports small custom orders and scalable production, guiding budgeting, workflows, and quality assurance.