UV DTF transfer is redefining how crafters and small businesses add durable, vibrant graphics to garments and hard surfaces, offering bold color, fine detail, and a workflow that fits into basement studios, home workshops, or small print shops while keeping the process approachable for non-professionals, with ink that resists cracking and a clear path from concept to finished item. As you explore this technology, you’ll see how it sits alongside traditional DTF printing, with UV-curable inks that cure quickly, reduce handling time, and resist color fade, while preserving flexibility across fabrics, blends, leather, and other substrates commonly used in personal projects and small-batch products. This guide is crafted for beginners, outlining a practical, step-by-step path from concept to finished transfer, and emphasizing a core toolkit, a consistent routine, color-management checkpoints, and hands-on practice that builds confidence without overwhelming you with jargon or overly complex equipment. You’ll learn how to choose the right substrates, assess fabric content and color, calibrate monitors and printer profiles, and tailor heat-press settings so results stay reproducible from one run to the next, including tips on preheating, dwell time, pressure, and post-press handling to maximize durability. With deliberate practice, documented test runs, and careful care of your printer, films, and heat press, you can grow a scalable workflow that supports a growing catalog of designs—from simple logos to full-color artwork—while maintaining quality as demand expands.
From a semantic and SEO perspective, the topic is described under related terms such as UV-curable film printing and film-based transfer methods, which describe similar processes with slightly different supplier terminology. In practical terms, think of it as a modern form of digital textile printing on film, where artwork is prepared in design software and printed with UV inks before being transferred to fabrics or hard goods with heat and pressure. Other related concepts you may encounter include film-to-substrate transfers and color-managed workflows that emphasize repeatability, substrate compatibility, and predictable results across varied materials. Understanding these LSI variants helps you compare equipment, inks, and films more effectively, avoiding assumptions when shopping for printers, curing lamps, or compatible films. This broader vocabulary empowers you to ask targeted questions, compare performance across fabrics, and plan projects that scale from hobbyist experiments to small commercial runs.
UV DTF Transfer Essentials for Beginners: Where It Fits in DTF Printing
UV DTF transfer sits at the intersection of UV-curable technology and the traditional direct-to-film workflow. As part of the DTF printing family, this method emphasizes vibrant, full-color designs with a relatively simple sequence of design, print, powder, cure, and press. For beginners, understanding where UV DTF transfer fits helps set expectations about speed, durability, and substrate compatibility. This aligns with a beginners guide to DTF by outlining the core steps without overwhelming new users.
The core advantage of UV DTF transfer is color fidelity and fast curing, which can reduce turnaround times on small batches. While the UV-curable inks cure quickly, you still rely on a heat press for the final transfer to fabrics and hard surfaces. Practically, this means mastering color management, selecting compatible films and powders, and validating your process with a few test runs before committing to production. Emphasizing good habits early—such as calibration and careful substrate testing—helps you approach DTF printing with confidence.
Starter Kit Essentials for UV DTF Transfer
A solid beginner setup for UV DTF transfer includes a printer capable of handling DTF film or a dedicated UV-curing printer, DTF film, and an adhesive powder designed for transfers. A reliable heat press with even temperature control is essential, along with a curing device or UV oven if you’re using UV-curable inks. A functional workstation, basic design software, and color management tools complete the foundation you’ll rely on as you learn the workflow.
As you build your kit, prioritize compatibility and manufacturer guidelines to minimize surprises. Start with a straightforward DTF workflow and gradually introduce UV-curable options as you gain experience. Keeping a routine—print, powder, cure, and press—helps you reproduce results and builds a repeatable process you can scale later in your UV DTF journey.
Design and Preparation for UV DTF Transfer
Effective UV DTF transfers begin with thoughtful design. Start with high-resolution artwork, using vector graphics for logos and crisp edges, and high-resolution raster images for photography elements. Understanding the color model is important as CMYK is common for printing, yet color separation and spot colors can help you achieve more exact tones on various fabrics.
Consider the final substrate early in your design process. Fabric type, color, and fiber content influence color appearance and the need for white underprint strategies to maintain vibrancy. Plan for a simple, repeatable workflow by establishing a standard print size, file naming, and preview checks to confirm mirroring needs when appropriate for your equipment.
Step-by-Step Workflow: Printing, Powdering, Curing, and Pressing
Printing on DTF film starts with loading the film correctly and ensuring alignment, print head health, and ink quality. Run test swatches to verify color fidelity and edge sharpness, and use a color profile suitable for your media. If you’re using UV-curable inks, ensure the curing step is compatible with the film and the adhesive powders you plan to apply.
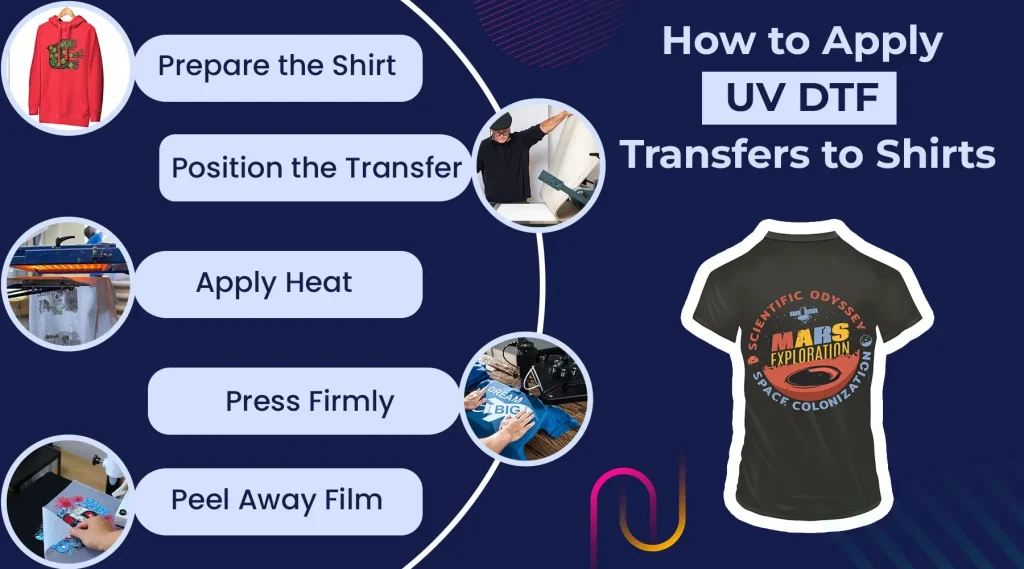
After printing, apply an adhesive powder evenly to the printed film, then shake off excess powder to avoid a heavy, stiff finish. Cure or dry the powder-coated film according to your materials, and prepare the film for transfer by placing it onto the substrate with the printed surface facing up (or as required by your setup). The final transfer uses heat and pressure from a calibrated heat press, followed by the appropriate peel method (hot, warm, or cold) based on your adhesive and film specifications.
Color and Durability: Optimizing Results on Fabrics and Surfaces
Color management is central to durable, vivid transfers. Use color profiles, calibrate your monitor, and print proofs to judge how designs will look on fabric. White underprints can dramatically improve brightness on colored fabrics, so plan for a background layer where appropriate to keep tones accurate and edges sharp.
Different fabrics—cotton, polyester, blends, and synthetics—respond differently to heat and adhesives. Adjust dwell time and pressure to avoid scorching or cracking, and design with texture in mind to prevent ink bleed on certain textures. Regularly test on scrap fabrics of the same material and color as your final product, document the conditions, and build a color-and-process reference you can reuse as you scale.
Troubleshooting, Maintenance, and Scaling Your UV DTF Workflow
Common issues like ghosting, color bleed, peeling, or edge lift often point to imbalances in color management, curing, or powder adhesion. Revisit your ICC profiles, confirm proper curing, and ensure adhesive powder quality and film compatibility. Regularly inspect the transfer surface and film for dust or contamination that could affect adhesion.
Maintenance and documentation are essential as you grow. Clean print heads and maintain the heat press platen for even pressure. Keep a log of successful configurations—fabric type, ink settings, powder method, cure times, and press timings—to reproduce consistent results. As you scale, explore additional substrates such as bags or caps and incorporate heat press tips for DTF into your routine to maintain quality across a broader range of projects.
Frequently Asked Questions
What is UV DTF transfer and how does it relate to DTF printing?
UV DTF transfer uses UV-curable inks printed on a direct‑to‑film (DTF) film and then transferred to textiles or hard substrates with heat. Compared with standard DTF printing (which often uses solvent or water‑based inks), UV DTF can offer faster curing, vibrant, high‑detail images, and strong adhesion, though it requires UV curing equipment and compatible inks. The typical workflow remains design → print → powder → cure → press, with the addition of a curing step before transfer.
As a beginner following a beginners guide to DTF, what equipment do I need to start UV DTF transfer?
Start with a beginner kit that fits your budget: a printer capable of handling DTF film or a dedicated UV-curing printer, DTF film, an adhesive powder, a curing device or UV oven, a reliable heat press, a work area, basic design software, and color management tools. Ensure all components are compatible with your supplier’s guidelines, then begin with the standard DTF workflow and add UV options as you gain confidence.
How should I design and prepare artwork for UV DTF transfer?
Prepare high‑resolution artwork, use vector graphics for logos and high‑quality raster images for photos, and apply proper color management (CMYK) to match prints. Consider the final substrate and use white underprints on colored fabrics to maintain brightness, and decide whether mirroring is needed for your setup. Create a simple, repeatable file naming and print‑size workflow to reduce testing.
What is the step-by-step workflow for UV DTF transfer from design to final press?
1) Design or source artwork and prepare for DTF printing. 2) Print on DTF film with UV‑curable inks. 3) Apply adhesive powder and ensure even coverage. 4) Cure or dry the powder. 5) Position the powder‑coated film on the substrate and press with a heat press at the recommended temperature, pressure, and dwell time. 6) Peel at the appropriate stage (hot, warm, or cold) depending on your setup and adhesive. Always start with manufacturer guidelines and test on scrap material.
What common mistakes occur with UV DTF transfer and how should I troubleshoot them?
Common issues include ghosting or color bleed from poor color management or incomplete curing, peeling or cracking from incorrect heat/dwell times or powder quality, uneven transfer on curved surfaces, and films lifting at edges from excessive pressure. Troubleshoot by recalibrating color profiles, ensuring proper curing, verifying adhesive powder quality, using jigs for curved items, and re‑pressing with evenly distributed pressure on scrap material before proceeding.
How can I maximize color quality and durability on UV DTF transfers, and what heat press tips for DTF should I follow?
Maximize color by using color management, proofing, and, where appropriate, white underprints to enhance vibrancy on colored fabrics. Test on similar fabrics and document conditions (fabric type, ink, powder, cure time). For heat pressing, follow your equipment’s recommended temperature, dwell time, and pressure, ensure even platen pressure, avoid over‑pressing edges, and maintain your press and films for consistent results. These heat press tips for DTF help improve durability and color longevity.
| Aspect | Summary |
|---|---|
| What UV DTF transfer is | A process that prints designs on UV-curable inks on DTF film and transfers them to textiles or hard surfaces via heat, delivering vivid, full-color results. |
| How UV DTF differs from standard DTF | UV DTF uses UV-curable inks cured quickly with UV light, potentially faster drying and different equipment needs than traditional solvent or water-based DTF inks with adhesive powder. |
| Starter kit & setup | Printer capable of DTF film (or a UV-curing printer), DTF film, adhesive powder, curing/UV device, a reliable heat press, design software, and a clean workspace. |
| Workflow overview | Design → print on DTF film → apply adhesive powder → cure/dry → transfer with heat press; test swatches and confirm whether mirroring is needed for your setup. |
| Design & preparation | Create high-resolution artwork (vector for logos, high-res raster for photos), CMYK color model considerations, substrate awareness (fabric color/type), and plan for straightforward file names and previews. |
| Printing, powdering, and curing steps | Print on DTF film with proper alignment and color management; apply adhesive powder evenly; cure/dry the powder; then transfer with heat and appropriate pressure and dwell time. |
| Color & durability tips | Use color management, consider white underprints for bright results on colored fabrics, test on scrap fabric, and maintain equipment for consistent results. |
| Common mistakes & troubleshooting | Ghosting/color bleed, peeling, or edge lift; address via proper curing, powder adhesion, temperature/dwell consistency, and substrate compatibility. |
| Care & maintenance | Wash inside-out, store films properly, and track successful settings to scale your UV DTF transfer workflow over time. |
| Advanced tips | Explore color separation, material-specific adjustments, durability-focused inks/films, and safety practices for powders and curing lamps. |
Summary
This table summarizes the key points about UV DTF transfer, including what it is, how it differs from standard DTF, essential gear, workflow steps, design considerations, troubleshooting, care, and advanced tips to help beginners build a scalable UV DTF transfer workflow.