UV DTF Transfer opens a vibrant path for turning digital artwork into wearable art on cotton, denim, and blends. This introductory guide walks through the UV DTF Transfer workflow, from preparing your design to applying the transfer with UV-curable inks and a heat press. Learn about UV DTF printing on fabric, the specifics of DTF transfer on cotton, and the nuances of DTF transfer on denim to keep colors bright and edges sharp. We also cover how to apply UV DTF transfers, including practical tips on ink curing, adhesive films, and post-press care to prevent cracking. With these steps, you’ll achieve durable, high-detail fabric printing with UV DTF that washes well and lasts over time.
For readers exploring this method under different names, think of it as UV-curable ink transfers on textiles, direct-to-film graphics, or garment decoration using UV inks. This LSI-informed framing uses related terms such as UV-curable transfer film, direct-to-film with UV inks, and fabric graphic transfer to capture the broader topic. You might see references to a UV-ink transfer on fabric or a DTF-style print on cotton or denim, all describing the same durable, high-detail result. By presenting these alternative terms, the content becomes more discoverable across related queries while preserving clarity for readers. Ultimately, the goal remains consistent: vibrant, long-lasting designs applied with heat and careful curing to a variety of fabrics.
Understanding UV DTF Transfer for Fabric Printing with UV DTF
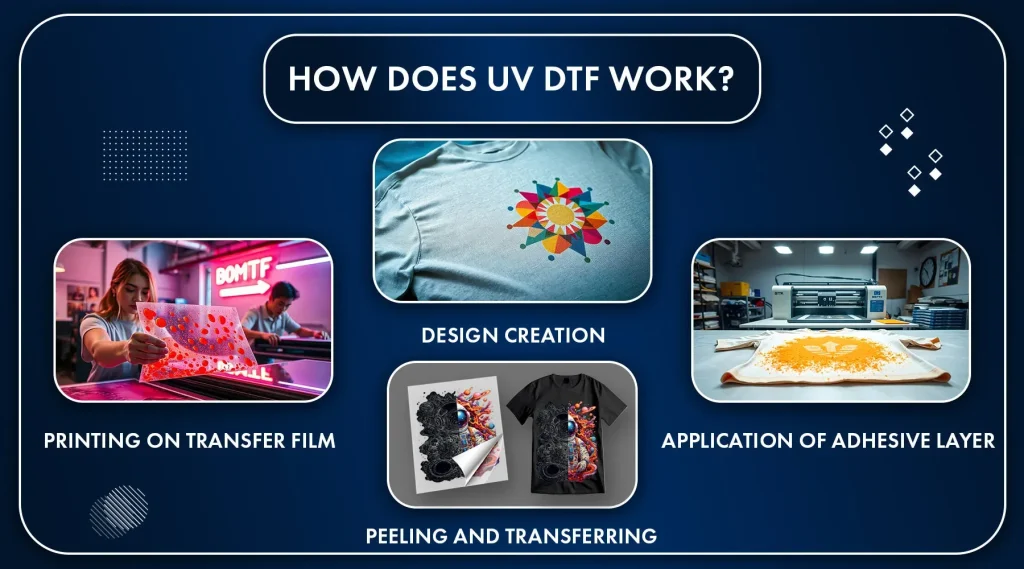
UV DTF Transfer blends the Direct-to-Film concept with UV-curable inks to create vibrant graphics that transfer from film to fabric. This approach emphasizes precise heat application and curing of the ink on transfer media, enabling sharp edges and high color density across a range of textures. When you explore UV DTF printing on fabric, you’re leveraging a workflow that prioritizes stable adhesion and quick cure times for efficient production.
In practical terms, UV DTF printing on fabric can yield durable results on cotton, denim, and blends, with a finish that often rivals traditional screen printing in detail. This method is particularly well-suited for projects where you need bright colors and fine lines, and it benefits from the ability to tailor heat and pressure to suit different substrates. The core idea is to marry UV-curable inks with a compatible transfer film to achieve clean edges and robust wear performance.
Choosing Fabrics for Optimal UV DTF Transfer on Cotton, Denim, and Blends
Cotton remains the most forgiving substrate for UV DTF Transfers, offering vivid color and reliable adhesion when properly cured. When planning DTF transfer on cotton, test patches help dial in heat, pressure, and dwell time to prevent edge lift or cracking. Denim, by contrast, is a heavier weave that requires a touch more heat and pressure to ensure the adhesive penetrates the fibers without scorching.
Blends can be a strong middle ground, offering stretch and drape while still accepting detailed UV DTF transfers. Always perform swatch testing on each fabric type, as stitch density and texture can affect ink cure and film adhesion. By starting with small trials, you can fine-tune the workflow for cotton, denim, and blends while maximizing color accuracy and durability.
Designing and Preparing Artwork for UV DTF Fabric Projects
Design preparation is critical for clean UV DTF results. Create or export artwork in high resolution, with vector files preferred for crisp edges. Raster images should be at least 300 DPI at the final print size, and color management should be used to preserve hues during the UV curing process.
Before printing, mirror the design if your workflow requires a direct transfer onto the reverse side of the film, ensuring it appears correctly on the garment after transfer. Also check transfer film quality for uniform coating, and pre-cut the media to fit the garment area. This preparation aligns with best practices for fabric printing with UV DTF and helps prevent alignment errors during press time.
UV DTF Transfer in Action: How to Apply UV DTF Transfers on Cotton and Denim
Step into the practical workflow: prepare the fabric (wash, dry, and press), print the design on the transfer film with UV-curable inks, and apply the adhesive layer if required by your film. Position the transfer on the cotton or denim item using registration guides, then cover with a protective sheet and apply consistent heat and pressure using a calibrated heat press.
After pressing, carefully peel the carrier while the fabric is warm if the film’s instructions call for it, or allow the transfer to cool fully before peeling. A final light press may be needed to ensure complete adhesion, especially on denser fabrics like denim. This section demonstrates how to apply UV DTF transfers to cotton and denim in a way that emphasizes edge definition, color fidelity, and durable wear.
Troubleshooting, Quality Control, and Best Practices for UV DTF Fabric Printing
Common issues in fabric printing with UV DTF include color shifts, edge lifting, or cracking on denim. Address these by refining color management, calibrating the media trace, and ensuring the transfer is flat before pressing. Regular testing patches help identify problems early and improve consistency across cotton, denim, and blends.
Quality control also involves verifying adhesive coverage and avoiding excessive dwell times that can trigger scorching or substrate distortion. Keep a clean workspace, document successful settings for each fabric type, and always perform a final visual check and cure verification before mass production. These practices support durable results and reliable performance of UV DTF transfers.
Care, Longevity, and Real-World Applications of UV DTF on Textiles
Once cured, UV DTF transfers can withstand everyday wear when cared for correctly. Recommend turning garments inside out and washing in cool water with gentle detergents, avoiding harsh chemicals that may degrade the adhesive over time. Dry on low heat or air-dry to preserve both color brightness and bond integrity.
The versatility of UV DTF transfers makes them suitable for a wide range of real-world applications, from custom cotton tees to denim jackets and blends used in promotional items. By following a structured workflow—from design preparation to post-press care—you can achieve professional finishes that stand up to repeated washing and daily use, all while leveraging the benefits of UV-curable inks and precise transfer processes.
Frequently Asked Questions
What is UV DTF Transfer and how does UV DTF printing on fabric work?
UV DTF Transfer blends Direct-to-Film (DTF) with UV-curable inks to apply sharp, vibrant graphics to a transfer film. The image is printed, cured, and then transferred to fabric using a heat press and an adhesive layer, delivering precise edges and bright color on cotton, denim, and blends. In short, UV DTF Transfer is a versatile option for fabric printing with UV DTF.
How to apply UV DTF transfers to cotton? (DTF transfer on cotton)
For cotton, follow the core steps of the UV DTF workflow: print the design on the transfer film with UV-curable inks, apply any required adhesive, cure the print, position the transfer on the garment, press with even heat and pressure, and then peel the carrier if instructed and perform a final press as needed. When done correctly, cotton yields bright color and strong adhesion in fabric printing with UV DTF.
How to apply UV DTF transfers to denim? (DTF transfer on denim)
Denim requires a bit more care: use higher pressure and a slightly longer dwell time to help the adhesive penetrate the fibers. Print on the transfer film, apply adhesive, cure, test on a denim swatch, place the transfer on the fabric, press with appropriate heat and pressure, and peel or cool as directed, finishing with a second light press if required.
Which fabrics are best for UV DTF Transfer and what is fabric printing with UV DTF like?
Cotton is the most forgiving substrate for UV DTF Transfers, delivering bright color and reliable adhesion when cured properly. Denim, being heavier, needs careful heat control and more pressure. Blends can work well, but heat and dwell time may need adjustment. Always start with a test patch as part of fabric printing with UV DTF to dial in settings.
What are the essential steps in the UV DTF Transfer workflow from design to finished garment?
Key steps include preparing high-quality artwork, printing on the transfer film with UV-curable inks, applying adhesive if required, curing the print, aligning the transfer on the garment, applying heat and even pressure, removing the carrier if needed, performing any required final press, and following proper post-care to protect color and adhesion.
What common issues can occur with UV DTF Transfer and how can you troubleshoot them?
Common issues include color not printing true, edges lifting after washing, cracking on denim, white outlines around colors, and color bleed between inks. Troubleshooting tips: verify color management and film calibration, ensure even pre-press and pressure, test on swatches, extend curing if needed, use protective sheets to promote uniform heat transfer, and keep the transfer flat during pressing.
| Aspect | Key Points |
|---|---|
| What is UV DTF Transfer |
|
| Benefits & Capabilities |
|
| Materials & Tools |
|
| Choosing fabrics |
|
| Design prep & setup |
|
| Cotton process (step-by-step) |
|
| Denim process |
|
| Other fabrics |
|
| Troubleshooting & optimization |
|
| Care after transfer |
|
| Real-world applications |
|
| Best practices |
|
Summary
UV DTF Transfer combines the flexibility of DTF with UV-curable inks to deliver vibrant, durable prints on fabric. The approach emphasizes careful design preparation, proper heat pressing, and post-press care to achieve high-detail graphics that endure wash after wash. By following a structured workflow—selecting suitable fabrics, preparing artwork, printing on transfer film, applying adhesive if required, and performing controlled heat presses—creators can reliably reproduce professional-quality results on cotton, denim, and blends. This method is accessible to hobbyists and small businesses alike, offering a robust pathway to wearable art.

